

An uncomplicated introduction to Uncomplicated Firewall
When I first started using Linux, back in ’97, working with the built-in firewall was not something just anyone could do. In fact, it was quite complicated. Starting around 1998, if you want to manage the security of a system, you had to learn iptables (which is a suite of commands for manipulating the Netfilter packet filtering system).
For example, if you want to allow all incoming secure shell (SSH) traffic, you might have to issue commands like this:
sudo iptables -A INPUT -p tcp --dport 22 -m conntrack --ctstate NEW,ESTABLISHED -j ACCEPT
sudo iptables -A OUTPUT -p tcp --sport 22 -m conntrack --ctstate ESTABLISHED -j ACCEPT
That’s all fine and good if you have time to not only master the Linux operating system, but also know the finer points of managing a complicated security system. To be fair, I did spend the time and was eventually able to manage the security of my systems with iptables.
However, the busier I got, the harder it became to continue the level of mastery needed to keep up with iptables. Over time, things started getting more accessible and some Linux distribution developers began to realize an easier system was necessary. One of those more accessible Linux firewalls came into being with the Ubuntu distribution (around version 12.04). That firewall is aptly named Uncomplicated Firewall.
Uncomplicated Firewall (UFW) is a frontend for iptables, which focuses on simplicity. Compared to iptables, UFW is a leisurely stroll through the park that anyone can handle.
Let’s take a walk down UFW lane and see just how simple it makes managing your Linux system firewall.
There are two things you should know about UFW:
- It’s a command-line tool.
- There are GUI tools available to make it even easier.
The UFW command-line basics
The UFW command is actually pretty simple. Let’s stick with our SSH idea from above. Let’s say you want to allow other systems to access your machine by way of SSH (which listens on port 22).
First, you’ll want to see if UFW is even enabled. Guess what…it’s not by default. Test that out by opening a terminal window and issuing the command:
sudo ufw status
You’ll probably see the following:
Status: inactive
How do you activate it? Issue the command:
sudo ufw enable
The output of the command should be:
Firewall is active and enabled on system startup
Congratulations, your firewall is now active.
As to the basic usage of UFW, it looks something like this:
sudo ufw ARGUMENT SERVICE
Where ARGUMENT is either allow, deny, reject, limit, status, show, reset, reload, enable, disable and SERVICE is the service you want to work with (such as SSH or HTTP).
Next, we need to allow SSH traffic into the system. Believe it or not, that’s as simple as:
sudo ufw allow ssh
You could also run the command using the port number, like this:
sudo ufw allow 22
Or, if you run SSH on port 2022, that command would be:
sudo ufw allow 2022
If you’re working on a server and you need to allow HTTP traffic through, that command would be:
sudo ufw allow http
Let’s get a bit more advanced
one of the nice things about UFW is that even using more advanced features doesn’t require advanced knowledge. Let’s say, for example, you want to allow SSH traffic in, but only from a specific IP address on your network.
If you’ve already allowed incoming SSH traffic, you’ll first need to delete that rule with:
sudo ufw delete allow ssh
Now, if you try to SSH into the machine, the firewall will block the attempt. So, let’s allow SSH connections from IP address 192.168.1.152. For that, we’d issue the command:
sudo ufw allow from 192.168.1.152 to any port ssh
After running the above command, you should be able to log into the machine, via SSH, only from the remote system at IP address 192.168.1.152.
What about the GUI?
If the command line isn’t your jam, there’s always a handy GUI tool to make it even easier. One such tool is GUFW, which allows you to point and click your way to UFW firewall rules. If UFW isn’t installed on your Linux distribution by default, you’ll find it in your app store. Once installed, open the app and click on the Rules tab (Figure 1).
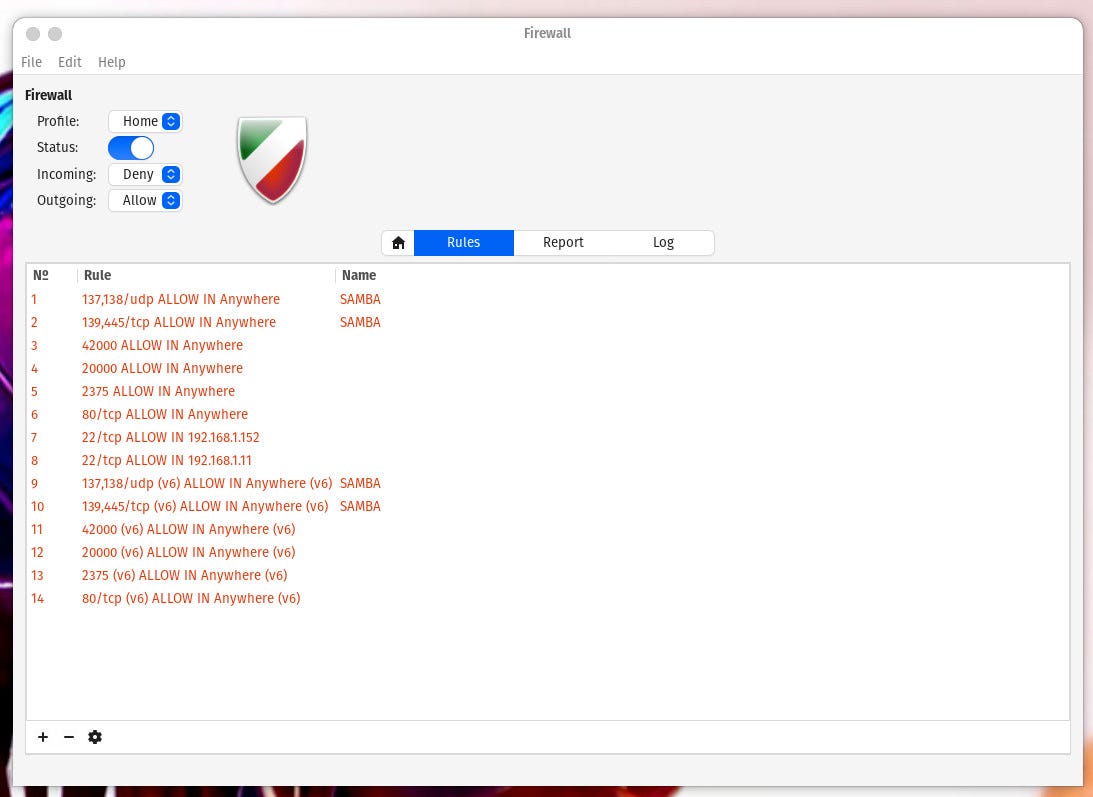
The GUFW tool makes configuring your firewall even easier.
Image: Jack Wallen
As you can see, I already have a few UFW rules added. One thing to keep in mind is that you cannot edit rules that were added via the UFW command line. Let’s add the same rule via the GUI that we just did from the command line. Click + and then (from the Preconfigured tab), select the following:
- Policy – Allow
- Direction – In
- Category – All
- Subcategory – All
- Application – SSH
That alone will create the rule allowing all SSH traffic into your system. If, however, you want to only allow traffic from a single IP address, you must click the Advanced tab and fill out the following (Figure 2):
- Name – any name you want
- Policy – Allow
- Direction – In
- Interface – All Interfaces
- From – 192.168.1.152

Adding a rule to UFW to only allow SSH traffic from IP address 192.168.1.62
Image: Jack Wallen
Click Add and your rule is inserted into the firewall.
And that, my friends, is your uncomplicated introduction to the Uncomplicated Firewall. But don’t think UFW is nothing more than a very basic firewall system. You can actually get considerably more complicated but for the basics, UFW is easy enough for anyone to use.


Pingback: Carpet Cleaning Gloucester City NJ
Pingback: dmt vape oil
Pingback: ข่าวบอล